Embedded checkout in headless applications
Introduction
BigCommerce offers a ready-to-use checkout experience that can be embedded into your headless application. This allows you to provide a seamless checkout experience to your customers without having to build it yourself.
In this article, we will go through the steps required to embed the BigCommerce checkout into your headless application.
Prerequisites
I assume that you have a BigCommerce store, BigCommerce API access and a headless application integrated with BigCommerce that you want to embed the checkout into. If you don't have a BigCommerce store, you can create a free trial.
If you don't have a headless application integrated with BigCommerce, you can check out the Vue Storefront 2 integration for BigCommerce 😉
BigCommerce setup
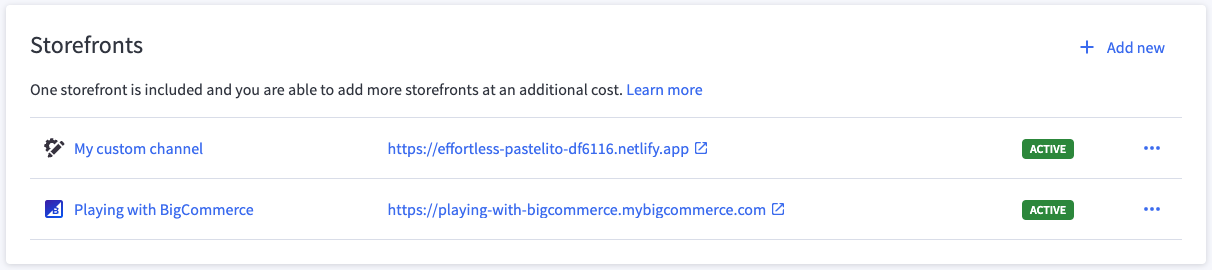
If you are developing a headless application, you should have a custom channel set up for your storefront in the BigCommerce Channel Manager.
 ;
;
If you don't have a custom channel set up, you can create one and create a site for it. It should be the URL of your headless application.
Creating a cart
Before embedding the checkout, first, you need to create a cart.
For headless applications, you should create a cart with the channel_id of your custom channel added to the request body. Also, you need to add a query parameter include=redirect_urls to the request URL. This will return the redirect_urls object in the response.
The createCart request could look like this:
import fetch from "node-fetch";

const storeHash = process.env.STORE_HASH;
const authToken = process.env.AUTH_TOKEN;
const channelId = process.env.CHANNEL_ID;

const url = `https://api.bigcommerce.com/stores/${storeHash}/v3/carts?include=redirect_urls`;

const params = {
  customer_id: 0,
  line_items: [
    {
      quantity: 1,
      product_id: 111,
    },
  ],
  channel_id: channelId,
};

let options = {
  method: "POST",
  headers: {
    Accept: "application/json",
    "Content-Type": "application/json",
    "X-Auth-Token": authToken,
  },
  body: JSON.stringify(params),
};

const res = await fetch(url, options);
const cart = await res.json();
WARNING
If you are trying that on the frontend, you will most likely get a CORS error. To avoid that, you can use a proxy server to make the request. A cool solution is a Netlify Functions feature. It allows you to run serverless functions on Netlify.
The response of the createCart request will contain the redirect_urls object. It contains the information about:
cart_url- the URL of the cart page,checkout_url- the URL of the standalone checkout page,embedded_checkout_url- the URL of the embedded checkout.
As you can see, the embedded_checkout_url is the URL that we need to embed the checkout into our headless application.
Example response of createCart request:
{
  "data": {
    "id": "36199f6e-3830-4408-abc0-1b241143aa57",
    "customer_id": 0,
    "channel_id": 1234567,
    // ...
    "redirect_urls": {
      "cart_url": "https://playing-with-bigcommerce.mybigcommerce.com/cart.php?action=load&id=36199f6e-3830-4408-abc0-1b241143aa57&token=0779668447bb3cb2842aa03f6b0371bdf3d4c13294de545f2349aa6f800b7336",
      "checkout_url": "https://playing-with-bigcommerce.mybigcommerce.com/cart.php?action=loadInCheckout&id=36199f6e-3830-4408-abc0-1b241143aa57&token=0779668447bb3cb2842aa03f6b0371bdf3d4c13294de545f2349aa6f800b7336",
      "embedded_checkout_url": "https://playing-with-bigcommerce.mybigcommerce.com/cart.php?embedded=1&action=loadInCheckout&id=36199f6e-3830-4408-abc0-1b241143aa57&token=0779668447bb3cb2842aa03f6b0371bdf3d4c13294de545f2349aa6f800b7336"
    }
  },
  "meta": {}
}
Embedding the checkout
Once you have the embedded_checkout_url, you can embed the checkout into your headless application.
WARNING
The best way to embed the checkout is to use the BigCommerce Checkout SDK, however, it's not working with Nuxt 3 yet. I've created an issue for that. I will update this article once it's fixed. To continue, I will use the <iframe> directly.
To embed the checkout, you need to add the <iframe> to your application. The src attribute of the <iframe> should be the embedded_checkout_url from the createCart response.
<iframe
  src="<EMBEDDED_CHECKOUT_URL>"
  width="100%"
  height="100%"
  frameborder="0"
></iframe>
I looks like the job is done, but unfortunately, it's not. You probably see the broken checkout like this:
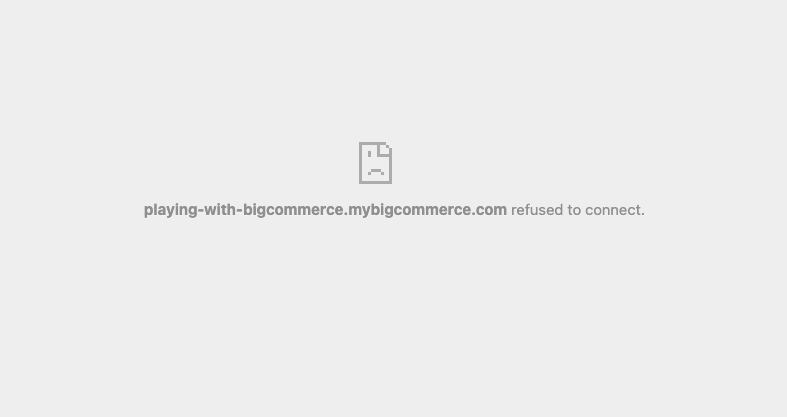
The checkout is not working properly, and it's not because of the simple <iframe>. The same issue is happening with the BigCommerce Checkout SDK.
In the console, you can see an error like this one:
Refused to frame 'https://playing-with-bigcommerce.mybigcommerce.com/' because an ancestor violates the following Content Security Policy directive: "frame-ancestors https://effortless-pastelito-df6116.netlify.app".
The problem is that the checkout is using the Content Security Policy (CSP) header to protect the checkout from malicious scripts. The CSP header is a security feature that allows you to control what resources the browser can load for a given page. It's a good thing, but it needs to be configured properly.
Configuring CSP header
To fix the CSP issue, you need to add the frame-ancestors directive to the CSP header. The frame-ancestors directive allows you to specify the origins that can embed the checkout.
To configure the header, you need to open the BigCommerce control panel and go to Settings > Security & Privacy. At the bottom of the page, you can see the Storefront section with Configure Content-Security-Policy Header Value field. All you need to do is to switch to Specify my own CSP header. In the checkbox, add a value for the CSP header:
frame-ancestors <YOUR_APP_URL>Be careful to not add the trailing slash at the end of the URL. The CSP header should look like this:
frame-ancestors https://effortless-pastelito-df6116.netlify.app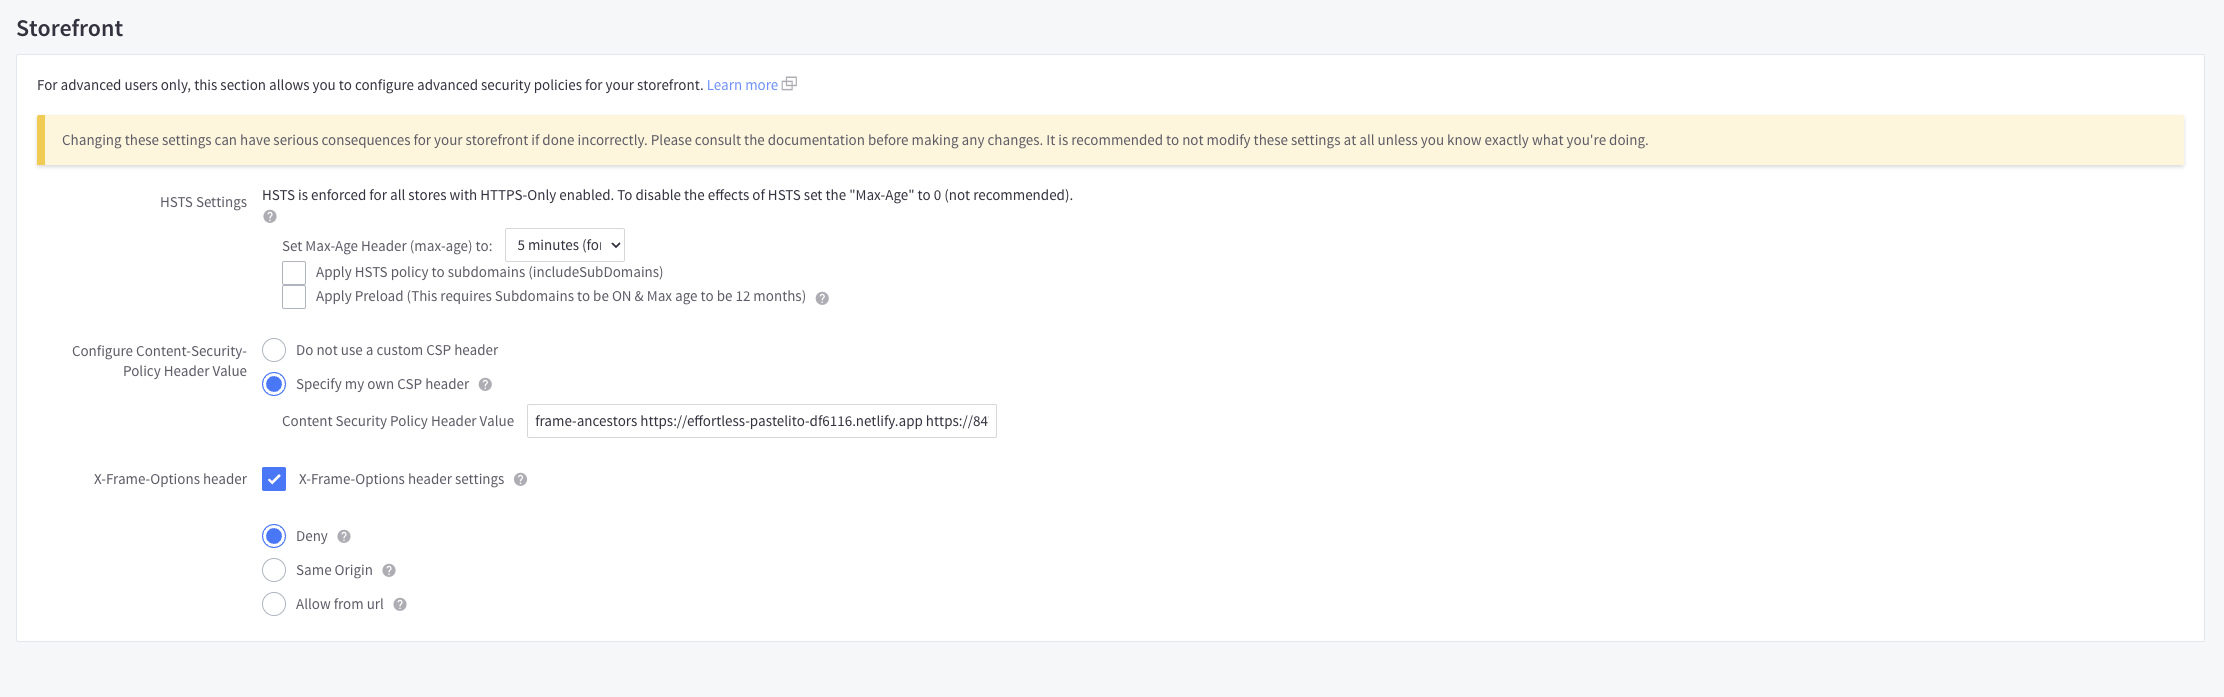
Multiple domains
If you want to embed the checkout on multiple domains, you can add multiple domains to the CSP header. For example, if you want to embed the checkout on https://effortless-pastelito-df6116.netlify.app and https://dev-embedded-checkout.netlify.app, you can add both domains to the CSP header:
frame-ancestors https://effortless-pastelito-df6116.netlify.app https://dev-embedded-checkout.netlify.appRemember, that each domain needs to be assigned to a custom channel, which ID you need to use in the createCart request.
Running checkout locally
A lot of effort, but until your application is not deployed, you won't be able to see the checkout anyway. If you want to run the checkout locally, you can use the ngrok tool. It's a tool that allows you to expose your local server to the internet. It's really easy to use. You just need to run the following command:
ngrok http <PORT>The PORT is the port on which your application is running.

It's forwarding the traffic from https://really-long-and-random-url.ngrok-free.app to your local server. You can use this URL in the CSP header and also as the custom channel site URL.

Finally, after visiting the https://really-long-and-random-url.ngrok-free.app URL, you can see the checkout embedded in your application:

INFO
Embedded checkout and authenticated users are even more fun, but I will write about it in another article.
Example application
If you want to see the Nuxt 3 application with the embedded checkout, you can check out the example application I've created. It's really simple, but it shows how to embed the checkout into a Nuxt 3 app. To call the createCart request without CORS errors, I've used a Netlify Functions feature.